Optimal Network & Connection Settings for Quake Live
Diagnose and fix lag, jitter, packet loss, and inconsistent hit registration
Focused on real network behavior — not placebo tweaks.
Why Quake Live Is Different
Quake Live is unusually sensitive to timing consistency
- Very small UDP packets — easily affected by buffering
- High update frequency — needs consistent delivery
- Tight hit verification windows — timing precision required
- Client-side prediction with server reconciliation — jitter causes visible corrections
As a result:
- Low jitter matters more than low latency
- Bufferbloat breaks gameplay while "ping looks fine"
- 1 Gbps bandwidth means nothing if packets arrive late or uneven
- Game quality correlates more with stable upload than download or raw ping
Latency vs Jitter
Understanding the difference
Latency (Ping)
The time it takes for a packet to travel from you to the server and back. Measured in milliseconds (ms).
Example: 25 ms ping means round-trip takes 25 ms.
Jitter
Variation in latency from packet to packet. If your ping fluctuates between 20–40 ms, you have 20 ms of jitter.
In Quake Live, high jitter causes inconsistent snapshot timing and visible warping.
| Scenario | Ping | Jitter | Experience |
|---|---|---|---|
| Stable fiber | 25 ms | ±1 ms | Smooth, consistent |
| Stable DSL | 40 ms | ±2 ms | Fine, slightly slower |
| Bufferbloat | 20 ms (avg) | ±50 ms | Warping, inconsistent hits |
Quick Test Sequence (5 minutes)
Test these first — in order
- 1 Test idle latency Ping a game server with no other traffic
- 2 Test jitter & packet loss Run packetlosstest.com — measures packet loss and jitter over time
- 3 Test connection quality Run speed.cloudflare.com — shows jitter, latency, and packet loss in one test
- 4 Check route stability Use WinMTR — visualizes packet loss & latency on the entire route
- 5 Test actual QL servers Ping ranger, mynx, omega (see Step 5 below)
Advanced Diagnostics
Additional tests for specific issues
Bufferbloat Test
If you experience lag spikes during uploads/downloads but your idle ping looks fine:
If your grade is D or F, enable SQM/QoS on your router (see Step 2).
Common Symptoms & Likely Causes
Quick diagnosis guide
| Symptom | Likely Cause |
|---|---|
| Green spikes in lagometer | Jitter / bufferbloat |
| Red spikes in lagometer | Packet loss |
| Shots feel delayed | Upstream congestion |
| Others say you warp (but you feel fine) | Unstable upload |
| Only one server feels bad | ISP routing / peering |
| Worse during uploads | Bufferbloat |
| Worse in evenings | ISP congestion |
Common Myths
Clear these up before diving deeper
| Myth | Reality |
|---|---|
| Faster internet = better Quake | Stability matters more than speed |
| DNS lowers ping | False — DNS only affects initial server lookup |
| Port forwarding fixes lag | False — QL uses outbound connections |
| Disable Nagle's algorithm | TCP only — QL uses UDP |
| Everyone should use same settings | Networks differ — test yours |
| Registry tweaks lower input lag | Unless a tweak changes your FPS, it does not change your latency — tested with hardware tools down to 0.1ms precision |
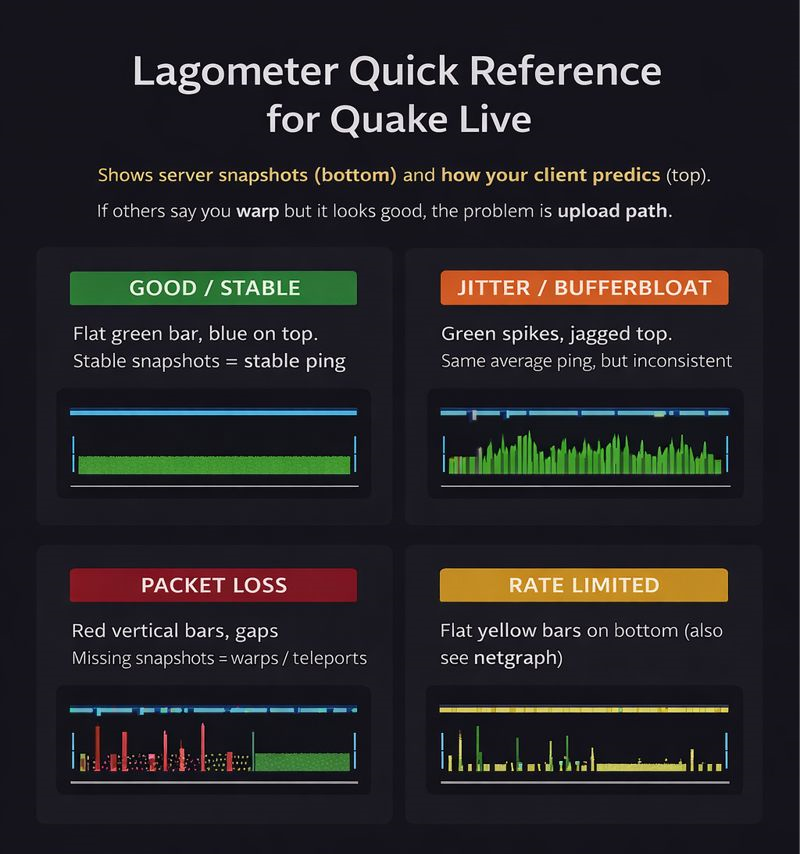
Understanding the Lagometer
Your primary diagnostic tool for network issues
The lagometer is a real-time graph showing how well your client is receiving data from the server. It's the single most useful tool for diagnosing connection problems in Quake Live.
cg_lagometer 1How to Read the Lagometer
The lagometer has two graphs stacked vertically:
Upper Graph — Client Prediction
Shows how well your client is interpolating between server snapshots.
| Blue (below baseline) | Interpolating between valid snapshots. This is normal and good. | |
| Yellow (above baseline) | Extrapolating — client is guessing because snapshots arrived late or not at all. Causes visible player warping. |
Lower Graph — Server Snapshots
Shows timing and delivery of snapshots from the server.
| Green (steady height) | Normal snapshot delivery. Height = current ping. | |
| Green (variable height) | Jitter — packets arriving at inconsistent intervals. | |
| Yellow bars | Rate-limited — server suppressed this snapshot (rate cvar too low). | |
| Red bars | Packet loss — snapshot never arrived. |
Visual Examples
Learn to recognize these patterns at a glance:
Test Your Own Connection
Reproduce issues to confirm bufferbloat:
- Join a server and enable
cg_lagometer 1 - Observe the lower graph — it should be steady green
- Start a speed test or cloud sync upload on your network
- Watch the lower graph: if green bars spike during upload, you have bufferbloat
- Enable SQM/QoS on your router to fix this
Scoreboard Ping is Reliable
The ping shown on the scoreboard uses actual game engine data, not a separate ping tool like some games. It's averaged over a few seconds, so it won't show instant spikes but accurately reflects your real connection to the server.
This means:
- Trust the scoreboard ping for your actual latency
- For spike detection, watch the lagometer instead
- If scoreboard says 40ms but feels like 80ms, the issue is likely jitter (use lagometer to confirm)
Step 1: Eliminate Local Network Issues
Fix problems at the source
Use Ethernet (Mandatory)
- Wi-Fi introduces jitter even with strong signal
- Powerline adapters are unreliable
- Use a direct Ethernet cable to your router
Eliminate Background Traffic
Disable or pause:
- Cloud sync (OneDrive, Google Drive, iCloud)
- Game launchers (Steam, Battle.net, Epic)
- Torrents / P2P
- Smart TVs / streaming devices
- OS updates
Network Adapter Settings (Windows)
Device Manager → Network Adapter → Properties → Advanced
| Setting | Value |
|---|---|
| Energy Efficient Ethernet | Disabled |
| Interrupt Moderation | Disabled |
| Flow Control | Disabled |
| Green Ethernet | Disabled |
| Speed & Duplex | 1.0 Gbps Full Duplex |
Only change settings that exist on your adapter.
Step 2: Router & ISP Equipment
Reduce bufferbloat and congestion
Enable SQM / QoS (If Available)
Look for:
- SQM
- QoS
- Smart Queue
- fq_codel / CAKE
- "Gaming mode"
Set bandwidth to 85–90% of your real speed (up & down). This prevents bufferbloat.
Bufferbloat Explained
UPLOAD FULL → router queues packets → game packets wait
           → packets arrive late
           → jitter spikes

Ping stays "low" but gameplay breaks.
Test Bufferbloat
Use: Waveform Bufferbloat Test — isolates bufferbloat from clean latency. If your lagometer spikes during an upload or download test, it often indicates bufferbloat.
| Grade | Interpretation |
|---|---|
| A | Excellent |
| B–C | Acceptable |
| D–F | Likely source of in-game issues |
Disable Packet Inspection Features
If present, disable:
- DPI (Deep Packet Inspection)
- IDS / IPS
- "Advanced security"
- Parental filtering
These cause latency spikes.
ISP-Specific Notes
DSL (VDSL / ADSL)
- Highly sensitive to bufferbloat
- SQM is critical
- Evening congestion common
Cable (DOCSIS)
- Shared medium
- Upload congestion very common
- SQM strongly recommended
Fiber (FTTH)
- Lowest latency
- Still affected by poor routers
- ISP routing issues still possible
Step 3: DNS (Correct Expectations)
Keep it simple
Use one resolver:
It only affects server discovery and initial connections.
Step 4: Quake Live Network Settings
In-game cvars that actually matter
rate 25000
com_idleSleep 0
cl_packetdup 2
cl_timenudge -20
About cl_packetdup
Packet duplication sends multiple copies of each input packet. If one copy is lost in transit, the duplicate can still arrive — reducing visible artifacts like player warping or teleporting caused by packet loss.
cl_packetdup 2 is the recommended general default. Duplicate packets add small upstream overhead, but on modern connections this is usually negligible.
cl_packetdup 0–1— stable connections with no packet losscl_packetdup 2— recommended general defaultcl_packetdup 3–5— lossy or unstable connections
About cl_timenudge
cl_timenudge -20 is the recommended default — it reduces interpolation delay by ~20 ms, making enemy movement feel more responsive. Most competitive players use this value.
Trade-off: less buffering means less tolerance for jitter. If you experience visible warping, try cl_timenudge 0 for smoother interpolation at the cost of slightly higher visual latency.
Recommended Profiles
Recommended default
cl_packetdup 2
cl_timenudge -20
Unstable / high jitter
cl_packetdup 3
cl_timenudge 0
Very lossy connection
cl_packetdup 5
cl_timenudge 0
Step 5: Test Real Quake Live Servers
Test with actual game servers, not synthetic benchmarks
Common EU Test Servers
| Server | Address |
|---|---|
| ranger | 57.129.16.240 |
| mynx | 77.90.2.53:27980 |
| omega | 136.244.82.9 |
Ping Test
Windows
ping -n 50 57.129.16.240Linux / macOS
ping -c 50 57.129.16.240Look for:
- 0% loss
- Tight min / avg / max
- No large spikes
Route Analysis (Advanced)
tracert / traceroute Basic route visualization — shows each hop to the server Step 6: Interpret Results
What your tests mean
| Observation | Meaning |
|---|---|
| Stable ping, no loss | Connection OK |
| High max, low avg | Jitter / bufferbloat |
| Loss everywhere | Local or ISP issue |
| One server bad | Routing / peering |
| Evenings worse | ISP congestion |
VPNs & Tunnels
- Can improve routing
- Can add latency
- Prefer WireGuard-based tunnels
- Avoid "privacy" VPNs for gaming
5-Minute Checklist (Quick Start)
Quick verification before playing
- Ethernet only
- Stop uploads/downloads
- Enable QoS / SQM if available
- Disable DPI / IDS
-
rate 25000+com_idleSleep 0 - Test real QL servers
- Watch lagometer
-
cl_packetdup 2+cl_timenudge -20
Technical Reference
Quick facts
| Protocol | UDP |
| Server tickrate | 40 Hz |
| Default port | 27960 |
| Hit verification | Server-side reconciliation |
This guide prioritizes reproducible behavior over superstition.
Fix the network first — then tune the client.